|
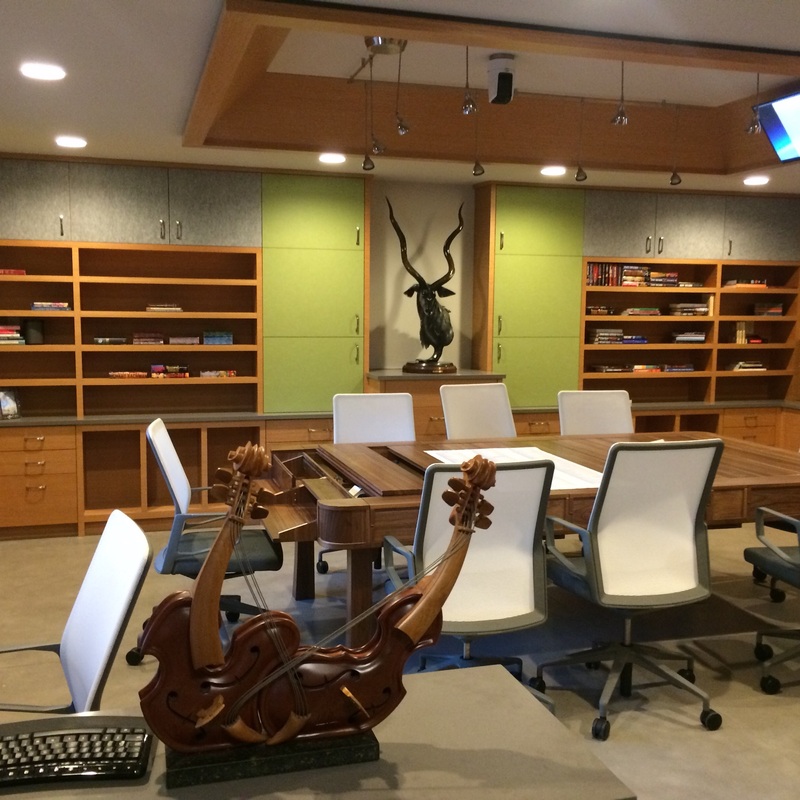
The last number of weeks have been rather crazy, and I apologize for the delay in this blog. Since I last blogged, the game room has been completed, and we have had a couple of sessions of Star Wars as well as some board games. The photo above was taken during the tour of our house today. I know this is incredibly short notice, but if anyone reading this would like to check our our Geek Chic Vizier table, or the game room, the tour is also on tomorrow (Sunday, September 18th, 2016) from 10am to 5pm. It is the AIA's Homes by Architects tour and ours is home number 13. Below are a few steps along the way. Work on the game room is progressing at a very fast clip. Last week, counters went in, and then work started on the upper cabinets. Most of the upper cabinets are in place. This is continuing this week with the installation of the rest of the upper cabinets as well as backplanes and trim work.
Above are some of the photos of different sections taken before the counters, afterwards, with upper cabinets and then some more descriptive close ups. My apologies that the before and after photos are not from the exact same spot (sometimes not even close). The wood is standard maple, with a cedar veneer on the cabinet faces. When you see the back of cabinetry with the veneer, that is typically shelving. Areas without the veneer are going to have doors. The two yellow circles on the floor are going to be power outlets. Directly above the table are connections for a Point-Tilt-Zoom (PTZ) camera, a monitor and additional track lighting. The camera will be trained on the map so that anyone joining us via Google Groups or such can see the playing field. The fourth picture is of the north wall. In the lower center of the upper cabinets, you can see three cupboards with veneer backs. The left and right sections will have magnetic white boards mounted in them for tracking initiative, effects, or anything else a white board is good for in the game we are currently playing. The center will have shelves which hold magnetic counters and dry erase markers. To the right of those, we have a cupboard for a microwave oven and directly below that, in the lower cabinets, will be a drawer refrigerator. I don't have the microwave yet, however, as long as it has a "popcorn" button it will work wonderfully. We have drawers of various sizes for figures, terrain, battle maps. Shelves for books, binders and other gaming items I want close at hand. Open cubbies for the gang to toss gaming bags, coats, motorcycle helmets, or other miscellaneous items that need temporary storage. While I wanted a lot of storage for gaming, not all of the storage down here is only for gaming. This will also be storage for our house, as we don't have as much as we did at our old house. So while you may find a giant bag of dice, you may also find a sewing machine or gift wrapping paper! I need to go shopping for a microwave, so will continue this with more progress within a week or so! One fine Wednesday Spencer and Thomas drove up in a Penske truck with the Vizier I had ordered almost two years ago. I was their last stop on their route delivering goodies all through the midwest (at my request as the house wasn't ready earlier).
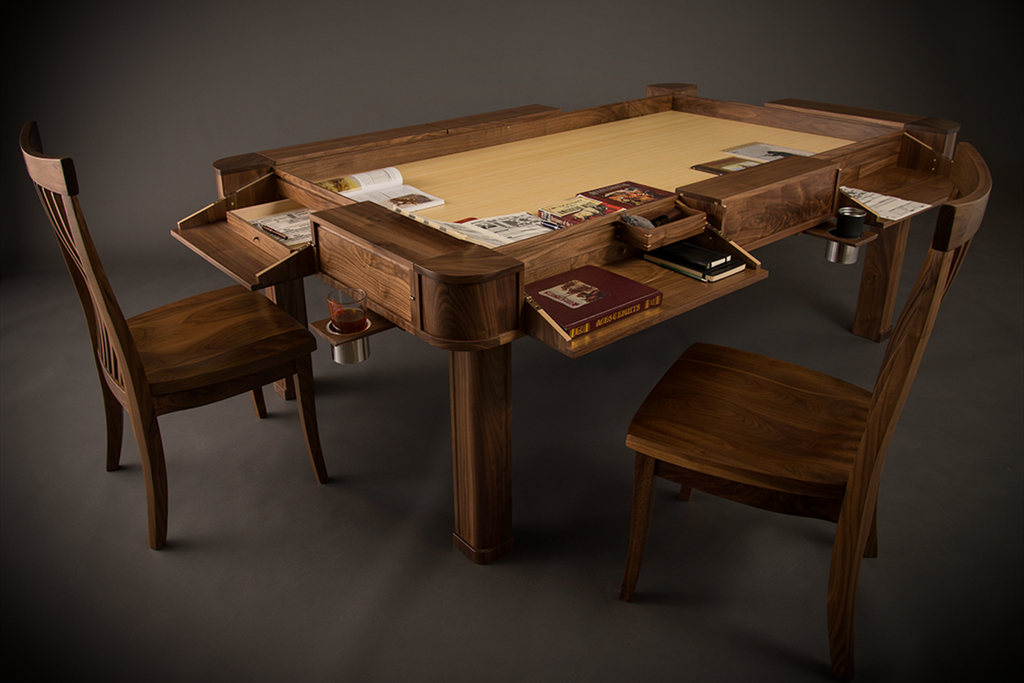
The first thing we did was to take a look at the possible pathways to get the table downstairs. After talking it over, they decided the route through the garage would be simplest and safest. After pulling the table off the truck and placing it on a moving dolly, they rolled it up our driveway. Once inside, Spencer and Thomas basically strong-armed the Vizier down the hallway. At the stairs, I went down first and spotted while a couple of guys working on our house helped Thomas and Spencer wrestle the Vizier downstairs, being careful not to damage any walls, ceilings or railings. They did a phenomenal job and the table made it safely downstairs. Once downstairs, I steadied the table while Thomas and Spencer got some tools and other parts of the table. The legs of the table and packaged separately for safety. The acrylic layer that sits at the bottom of the "vault" numerous screws and fasteners, accessories, etc also came in separate boxes. Once everything was ready and in place, the guys unwrapped the table legs (photo 9&10) and set them near each corner of where the table will go. They then removed the packing material from the top of the table, lifted the table and held it in place. Meanwhile, I quickly set each table leg into the appropriate slot (photo 11) in the table. Once the table was resting on the legs, Thomas and Spencer secured each table leg. I took a couple of closeup photos of the inside of the table where these are secured. Frankly, being able to see the inside workings of the table was very cool. Photos 12 & 15 are two of my favorites. I'll chat more about the table in the next blog. Once the legs were secured, the bamboo vault floor was secured in place, then the acrylic was unwrapped and laid down. The acrylic layer is suitable for either wet or dry erase markers. It also comes with a suction cup for ease of removal. Next, the tape from all the moveable parts was removed. Drawers were placed in their slots, table leaves were tested for fit (they worked great) and basically, every movable part and accessory was installed and tested for fit. We also ordered a couple of "Leaf Guards" (photos 19&20). These are designed to allow you to have some table leaves in place but not all. For example, if you want to have a smaller "vault" space, more tabletop space, you use a leaf guard so that dice, figures, counters, etc won't slip under the table leaves. I also have a felt top. This is smaller than the top of the table as I figured we will be using it for card or counter games. Typically those games would be limited to six players, so the additional table space is more important. It also makes the felt table top easier to store when not in use. In the photos I show the felt table top used with a couple of table leaves. After Thomas and Spencer went over care of the table and accessories, we went over the paperwork together, I signed off on it and thanked them both again (probably for the hundredth time:)) and they were on their way back to Washington. I wanted to share my experience in buying and using a Vizier gaming table from Geek Chic. Geek Chic makes custom furniture for gamers of a variety of shapes and sizes. These can be used for Role Playing Games (RPGs), Board Games or Card Games. In my case, the table will be used primarily for RPGs, with board or card games on occasion. This is the centerpiece we built our game room around.
The wait time, from order to delivery is typically 12-18 months. In my case, the Vizier was ready about 15 months after my initial order. However, due to our house not being completed as quickly as we first thought, we ended up taking delivery after 21 months. After placing my request online, Beth contacted me to discuss the specifics of our order. She asked a number of questions geared towards getting me the perfect table with the perfect accessories for our gaming needs. The table and accessories they recommend vary depending upon what type of games you play (card, counter or role playing games), how often, if the table will be a dedicated gaming table or also a dining room, coffee, or other type of table. They have a table for any type of gamer:) Some of the options for the Vizier included nine table sizes, varying table heights including "bar height". A choice of inserts for the "vault". Sliding cup holders and more. I ordered the 5' by 8'8" table. We have a large gaming group (8-11 people). With this size table, 8 players and the game master can comfortably sit around the table. We have 1 or 2 people that join us online. We also have a fabric lid. This sits on top of the "vault", flush with the top of the table. It is a great surface for playing card games. The fabric lid is also reversible, the other side of it is craft board. After being very patient with me, and answering all my questions (sometimes checking with the production guys to see if something special could be done) the order was ready. It then went into the production queue. The estimate Beth gave me was pretty much spot on. Unfortunately, my estimate for our house being built was not. So we asked for a delay. No grief, no huffiness, Geek Chic was happy to oblige us, they are a great group to work with. During this process I also worked with Dash (their Logistics Manager) and then was handed over to Danny. Above are some photos of my Vizier's journey through the shop.
Danny sent these to me after my table was built. He is a part of the Valet team at Geek Chic. Basically, he was my point of contact once the table went into production. The first photo is of the wood after some initial selection and cutting. Next, the pile of individual pieces, then a couple of assembly. In the sixth photo the Vizier is ready for clear coating. And the seventh is just after the clear coat when it is getting its final checks. Once we arranged our delivery date and my Vizier left Washington on a truck, I communicated directly with the delivery team, Thomas and Spencer. If you have any questions about the ordering experience I had, please don't hesitate to ask. |
AuthorMark has been gaming for about 35 years. DnD, Star Wars, board games of all sorts. Archives
September 2016
Categories |


 RSS Feed